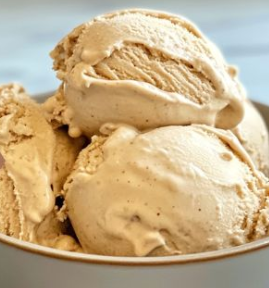
Easy 3-Ingredient Dog Ice Cream Recipe
If you’ve ever sat on a hot summer day enjoying an ice cream cone while your dog stares at you with those big, pleading eyes, you know the guilt is real. Now, you can turn that moment into pure joy for both of you with a simple homemade dog ice cream that requires only three ingredients. This isn’t some fancy, complicated dessert—it’s a quick, healthy, and fun treat your dog will adore, and it’s easier to make than you think.
I started making these frozen treats during one scorching heatwave. My dog was looking at me as if I personally caused the rising temperatures. Watching her excitement the first time she tried this ice cream—she practically danced in anticipation—it became clear that the sound of the freezer opening could now rival her favorite squeaky toy. It’s honestly one of those little moments that make being a dog parent so rewarding.
Ingredients You’ll Need
For this recipe, you’ll only need a few staples you probably already have in your kitchen:
- 2 cups plain Greek yogurt (unsweetened, no additives)
- 1 ripe banana, mashed
- 5 tablespoons natural peanut butter (make sure it’s xylitol-free)
You can also add some optional goodies to make it even more exciting:
- A handful of fresh or frozen blueberries
- A drizzle of honey (use sparingly)
- Shredded carrots for a crunchy texture
- Sliced strawberries for a fruity twist
- A sprinkle of chia seeds for extra fiber
Equipment Needed
You won’t need anything fancy:
- Blender or food processor for a creamy texture
- Mixing bowl
- Measuring cups and spoons
- Ice cube tray or silicone molds for freezing
- Freezer to chill the treats
Step-by-Step Instructions
Step 1: Prep the Banana
Start by choosing a super-ripe banana. It should be soft and speckled with brown spots, which makes it naturally sweeter and easier to mash. Peel it and place it in a bowl, then use a fork or potato masher to mash until smooth. A few small lumps are okay if you like a bit of texture, but for the creamiest results, aim for mostly smooth.
Step 2: Blend the Base
Now toss the mashed banana into a blender or food processor. Add your Greek yogurt and peanut butter, making sure the peanut butter contains no xylitol—it’s toxic to dogs. Blend until smooth and creamy, scraping the sides to mix in any stray bits. If you don’t have a blender, whisk everything together in a bowl until fully combined. You’re looking for a thick, milkshake-like consistency.
Step 3: Check the Consistency
Give your mixture a taste (just a little, dogs first!). It should be thick but pourable. If it’s too runny, add a little more peanut butter. If it’s too thick, add a teaspoon of water. Getting this right ensures the ice cream freezes perfectly—not icy or rock-hard.
Step 4: Add Optional Goodies
This is where you can get creative. Toss in some blueberries, shredded carrots, or sliced strawberries. Sprinkle in chia seeds or drizzle a tiny bit of honey if you want a touch of natural sweetness. Stick to one or two add-ons at a time to maintain the texture and make sure each bite is easy for your dog to enjoy.
Step 5: Prep Your Molds
Silicone molds shaped like paws, bones, or hearts are adorable, but ice cube trays or mini muffin tins work perfectly too. If using trays, a light coating of cooking spray helps with easy removal. Make sure your molds are on a flat surface to avoid spills.
Step 6: Fill the Molds
Spoon the mixture into your molds, filling about ¾ full to allow for expansion as it freezes. Smooth the tops and tap the tray lightly to remove air bubbles. If you’re using a baking sheet, drop tablespoon-sized dollops, spaced about an inch apart.
Step 7: Freeze It Solid
Place your molds in the freezer for at least 3–4 hours, or overnight for best results. Smaller molds may set a bit faster, but ensure they’re completely firm before serving. A frozen treat that’s too soft can be messy, so patience pays off.
Step 8: Pop Out the Treats
Remove your frozen treats carefully. Silicone molds are easy—just twist or push from the bottom. Ice cube trays may need a quick rinse under warm water to release the treats. If using a baking sheet, peel them gently off the parchment. Now your dog is ready for a cool, refreshing snack.
Step 9: Serve and Store
Offer one treat at a time to your dog and watch the excitement! Store the extras in an airtight container or freezer bag for up to two weeks. Layer parchment between treats to prevent sticking and always check for freezer burn before serving.
Feeding Guidelines
Treats are occasional snacks, not meal replacements. Depending on your dog’s size, 1–2 small frozen treats per day is plenty. Keep an eye on dairy sensitivities, as Greek yogurt is the main ingredient. Moderation ensures your dog enjoys the treat without upsetting their stomach.
Pro Tips to Make These Treats a Total Win
- Yogurt Check: Stick with plain Greek yogurt, preferably full-fat for richness or low-fat if you’re watching calories. Look for live cultures to support digestion.
- Peanut Butter Safety: Only use natural peanut butter free from xylitol. Stir well if the oil has separated.
- Banana Ripeness: Brown, soft bananas are sweeter and easier to blend than green ones.
- Add-On Balance: Keep extras limited to 1–2 ingredients to maintain texture. Too many can make the treats crumbly.
- Mold Hacks: Silicone molds are the easiest to pop out. Ice cube trays need light greasing for smooth removal.
- Serving Size: Half a treat is enough for small dogs, while larger dogs can enjoy 1–2 treats. Limit to 1–2 times per week.
Benefits of the Ingredients
- Greek Yogurt: Packed with protein and probiotics, it supports digestion and muscle health.
- Banana: Provides potassium, vitamin C, and fiber while naturally sweetening the ice cream.
- Peanut Butter: Adds healthy fats and protein. Make sure it’s free of xylitol to keep it safe.
Tips for Customizing
- Adjust Sweetness: Add a drizzle of honey or extra banana if your dog prefers sweeter treats, but avoid overdoing sugar.
- Layered Ice Cream: Create layers using different mix-ins like a banana-peanut butter base topped with blueberries.
- Spoonable Version: Let the treats thaw slightly for a soft-serve texture your dog can enjoy on especially hot days.
Conclusion of Easy 3-Ingredient Dog Ice Cream Recipe
Making dog ice cream at home is simple, fun, and incredibly rewarding. With a few basic ingredients and a little creativity, you can treat your dog to a cool, delicious, and healthy snack that’s perfect for summer or anytime. The optional add-ons let you tailor each batch to your dog’s taste, making every treat exciting and special. Watch your furry friend’s excitement as they enjoy a frozen delight made just for them!