Homemade Chicken and Oatmeal Dog Food Recipe (Complete Nutrition in One Pot)
I started making homemade dog food because I got tired of flipping bags over and reading ingredients I couldn’t pronounce. My dog was doing fine on kibble, but fine isn’t really what I was going for. I wanted to actually know what was going into his bowl every single day.
The first time I made this chicken and oatmeal recipe I kept it simple on purpose — chicken, oats, a few vegetables, one pot. No complicated steps, no specialty ingredients, nothing I’d have to order online. It came together faster than I expected and my dog ate every last bit of it.
I’ve been making it regularly ever since, and it’s become my go-to for batch cooking. It’s affordable, it’s easy to store, and I can see the difference it makes in my dog’s energy and digestion. Once you try it, I think you’ll understand why I stopped overcomplicating things.
Key Takeaways
- One pot, minimal cleanup, and the whole thing comes together in under 45 minutes
- Chicken provides complete protein while oats add fiber and steady energy
- You can batch-cook this and freeze portions for up to six months
- Serving sizes vary by weight — I include a full breakdown further in the article
- There are grain-free and high-protein variations if your dog has specific needs
- Always check with your vet before switching to homemade food, especially for dogs with health conditions
Why This One-Pot Recipe is a Must-Try
I’ve tried a lot of homemade dog food recipes over the years, and most of them either require ingredients I don’t have, take way too long, or leave me with a mountain of dishes. This one is genuinely different, and I think once you try it, you’ll feel exactly the same way.
Good for Digestive Health
The combination of oats, chicken, and soft-cooked vegetables makes this one of the gentlest meals I’ve ever made for Biscuit. The soluble fiber in oats works alongside the easily digestible chicken protein to keep his stomach settled, and I’ve noticed a real difference in his digestion since I started making this regularly.
Cost-Effective
I’ll be honest — I was spending a small fortune on premium kibble before I started making this. Pound for pound, this recipe costs me noticeably less, and I know exactly what’s going into every single bite. Fresh ingredients, no mystery fillers, and way better quality control than anything in a bag.
Meal-Prep Friendly
One good cooking session on a Sunday afternoon gives me enough food to last through most of the week, sometimes longer. I portion it into containers, stack them in the fridge or freezer, and Biscuit’s meals are handled. It genuinely takes the daily stress out of feeding time.
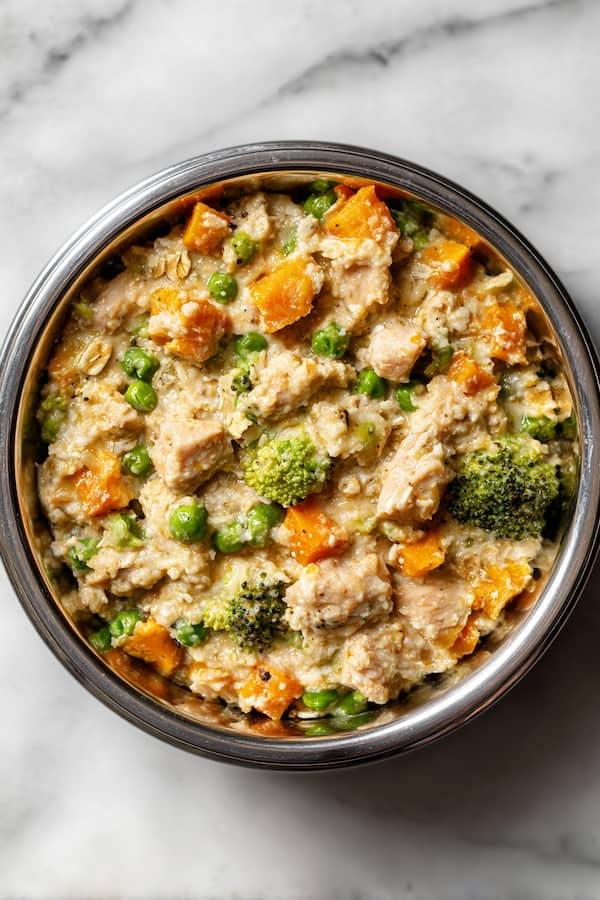
The Complete One-Pot Chicken and Oatmeal Dog Food Recipe
This recipe makes approximately 6 to 8 cups of finished food, which is enough for around 10 to 14 meals for a 50-pound dog. I scale it up when I want to stock the freezer, and it holds up beautifully either way.
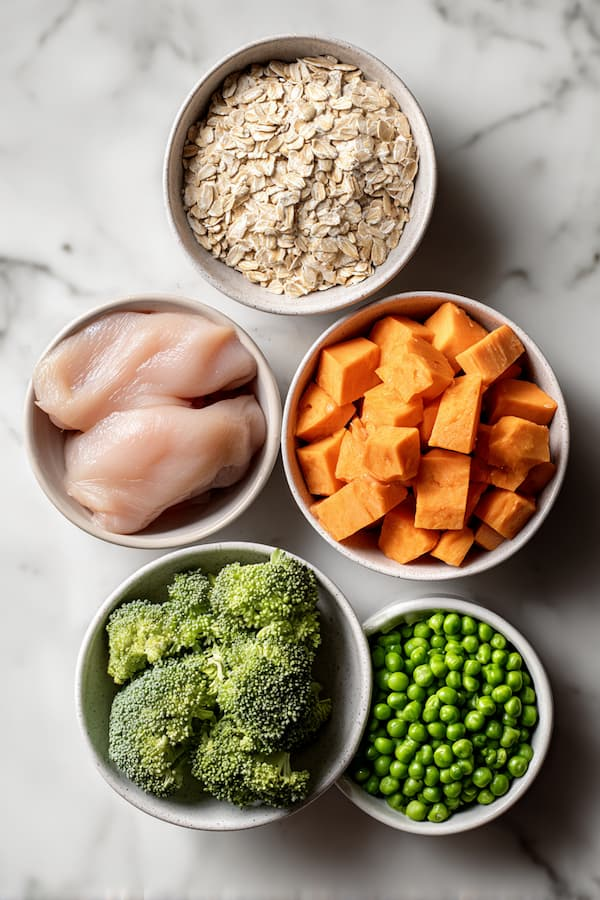
Ingredients
| Ingredient | Amount |
|---|---|
| Chicken breast (skinless) | 1 lb |
| Old-fashioned oats | 1 cup |
| Sweet potatoes | ¾ cup diced |
| Fresh or frozen peas | ½ cup |
| Fresh broccoli florets | ¼ cup chopped |
| Extra virgin olive oil (optional) | 1 teaspoon |
| Water | 3–4 cups |
Step-by-Step Cooking Instructions
Preparation Phase
Step 1: Protein Preparation
I take the chicken out of the fridge about 15 to 20 minutes before I start cooking — it helps it cook more evenly throughout. Then I cut it into small, uniform half-inch cubes so every piece cooks at the same rate and is easy for Biscuit to eat without me needing to break it up later.
Step 2: Vegetable Prep Work
I wash and peel the sweet potato first, then dice it into half-inch pieces just like the chicken. The broccoli gets chopped into small, even florets — nothing too chunky. If I’m using fresh peas I shell them ahead of time, but frozen peas go straight in from the bag and work just as well.
Cooking Foundation
Step 3: Initial Searing (Optional)
This step is completely optional, but I do it when I have a few extra minutes because it adds a really nice depth of flavor to the whole pot. I heat the pot over medium-high, add the olive oil, and lightly brown the chicken cubes for two to three minutes. It’s a small thing that makes a noticeable difference.
Step 4: Build the Base
If I skipped the searing, I add the raw chicken and sweet potato cubes directly to the pot at this point. Then I pour in enough water to sit about an inch above everything — usually somewhere between three and four cups depending on how wide my pot is.
Step 5: Begin the Cooking Process
I bring everything to a rolling boil over high heat, then immediately drop it down to medium so it settles into a steady simmer. Walking away and letting it do its thing from here is honestly one of my favorite parts of this recipe.
Vegetable Integration
Step 6: Timing the Additions
I let the chicken and sweet potatoes cook together for about 10 to 12 minutes before adding anything else. Sweet potatoes need that head start — they take longer than the other vegetables, and skipping this timing step is the most common reason the texture ends up off.
Step 7: Add Supporting Vegetables
Once the sweet potatoes are just fork-tender, I add the broccoli and let it cook for three to four minutes. I keep a close eye on it here because broccoli goes from perfect to mushy very fast, and I want it tender but still holding its shape.
Step 8: Final Vegetable Addition
The peas go in last and only need two to three minutes. They cook incredibly quickly, and I pull them off heat while they’re still bright green and just slightly firm. Overcooked peas turn dull and lose a lot of their nutritional punch.
Pro Tip: I always add the vegetables in order of how long they take to cook — sweet potatoes first, broccoli second, peas last. It keeps everything at the right texture without any guesswork.
Final Cooking
Step 9: Oat Incorporation
Once all the vegetables are where I want them, I stir in the oats gradually while mixing constantly so they don’t clump. I drop the heat to low and let everything simmer together for eight to twelve minutes, stirring occasionally as the oats absorb the liquid and the whole thing thickens up into something that looks genuinely hearty.
Step 10: Consistency Check
The finished food should hold its shape on a spoon without being dry, sticky, or soupy — think thick stew, not porridge and not broth. If mine gets too thick I add a small splash of water. If it’s too loose I let it cook uncovered for a few more minutes and it comes right together.
Step 11: Cooling and Texture Assessment
I take the pot off the heat and let it cool for 15 to 20 minutes before portioning. It thickens just a little more as it cools, so I don’t panic if it looks slightly loose right off the stove. It always sets up nicely.
Serving Suggestion
| Dog Weight | Daily Food Amount | Meals per Day |
|---|---|---|
| 10–20 lbs | 1–1½ cups | 2 meals |
| 21–35 lbs | 1½–2½ cups | 2 meals |
| 36–50 lbs | 2½–3½ cups | 2 meals |
| 51–70 lbs | 3½–4½ cups | 2 meals |
| 71–90 lbs | 4½–5½ cups | 2–3 meals |
| 90+ lbs | 5½–7 cups | 2–3 meals |
Special Dietary Adjustments
For puppies between six and twelve months, I feed two to three times the adult portion divided across three to four meals a day. Growing dogs burn through calories fast and need that extra fuel to support healthy development.
Senior dogs over seven years old often need about ten to twenty percent less food since their metabolism slows down. I watch Biscuit’s body condition closely and adjust his portions based on how he’s looking and feeling rather than sticking rigidly to the numbers.
Active or working dogs may need twenty-five to fifty percent more than the standard amounts depending on how hard they’re running. And for dogs that need to lose a little weight, I reduce portions by ten to fifteen percent and add a few extra vegetables to keep them feeling full.
Disclaimer: I’m not a veterinarian or certified canine nutritionist. Every dog has unique needs based on their age, breed, size, and health. If you’re new to homemade dog food or your dog has specific medical conditions, please consult your vet before making any dietary changes.
Storage Solutions
Short-Term (Up to 5 Days)
I store cooled portions in airtight glass containers in the fridge, usually packed for one to two days at a time. Before serving I take the container out about ten to fifteen minutes early so the food comes up to room temperature — Biscuit much prefers it that way over cold straight from the fridge.
Long-Term (Up to 6 Months)
For longer storage I freeze meal-sized portions in freezer-safe bags or containers, leaving a little room at the top for expansion. For smaller dogs or controlled portions, silicone ice cube trays work brilliantly. I always label everything with the date and rotate oldest portions to the front.
Thaw and Serve
I always thaw in the fridge rather than on the counter — usually four to six hours is plenty. If I want to take the chill off I’ll warm it in the microwave for ten to fifteen seconds, but I’m careful not to overheat it since high temperatures can degrade some of the nutrients I made the food specifically to preserve.
Pro Tip: I batch-cook this on Sundays, fill a week’s worth of fridge containers, and freeze the rest in labeled bags. It genuinely takes one hour of my weekend and saves me daily stress every single morning.
Recipe Variations for Special Needs
Grain-Free Version
If your dog needs to avoid grains, I swap the oats for one and a half cups of cooked quinoa, or I simply increase the sweet potato to make up the bulk and add two tablespoons of ground flaxseed for omega-3 fatty acids. When using quinoa I cook it separately and stir it in during the final five minutes rather than letting it absorb liquid in the pot.
High-Protein Version
For dogs that need more protein — whether for muscle recovery, higher activity, or specific health goals — I increase the chicken to one and a half pounds, chop in two hard-boiled eggs during the final few minutes of cooking, and stir in a quarter cup of plain Greek yogurt after the pot cools. I also reduce the oats slightly to three-quarters of a cup so the consistency stays right.
Nutritional Benefits
Complete Amino Acid Profile
Chicken is one of the best sources of complete protein I can put in Biscuit’s bowl — it delivers every essential amino acid he needs. The oats layer in additional plant-based amino acids on top of that, so the overall protein profile is genuinely well-rounded without needing any fancy additions.
Digestive Health Support
The fiber in this recipe comes from two directions — soluble fiber from the oats and insoluble fiber from the vegetables — and together they do a great job supporting regular, healthy digestion. I’ve personally seen Biscuit’s stomach sensitivities improve significantly since I started making this, and that alone made it worth keeping in the rotation.
Immune System Enhancement
The vegetables in this recipe aren’t just filler — broccoli, sweet potato, and peas each bring their own vitamins and antioxidants that support immune function over time. I think of the vegetables as Biscuit’s daily insurance policy, and making sure they’re always in the pot is non-negotiable for me.
FAQs
Can I add supplements to this homemade chicken and oatmeal dog food recipe?
Yes, and I actually do add a fish oil capsule to Biscuit’s bowl a few times a week. That said, I always run any supplement changes past my vet first because too much of certain things — like calcium — can actually cause problems rather than fix them.
Get personalized guidance based on your dog’s age and health before adding anything.
What if my dog picks around the vegetables or refuses to eat them?
I ran into this with Biscuit early on. My fix was cooking the vegetables a little longer so they soften completely into the mixture, or mashing them slightly so they blend in with the oats and chicken. Most dogs stop noticing once the texture is consistent throughout the whole bowl.
Can puppies eat this recipe safely?
Puppies can eat this, but they need more calories and calcium than this recipe provides on its own. I’d use it as a base and talk to your vet about what modifications make sense for your pup’s age, breed, and growth stage before making it their primary food.
Can I use frozen vegetables instead of fresh?
Absolutely — I use frozen peas almost every time because they’re already prepped and they work perfectly.
Just keep in mind that frozen vegetables cook a little faster than fresh, so I start checking doneness a minute or two earlier than the recipe suggests.
How do I know if my dog is getting the right amount of this food?
I go by body condition rather than just cup measurements. You should be able to feel your dog’s ribs without pressing hard but not see them from across the room.
If your dog is gaining weight, reduce portions slightly. If they seem thin or low-energy, increase them. Your vet can also do a proper body condition assessment at any checkup.
Is this recipe safe for dogs with sensitive stomachs?
It’s one of the reasons I originally kept making it — Biscuit has always had a sensitive stomach and this food is consistently gentle on him. The plain chicken, oats, and cooked vegetables are all low-irritant ingredients.
That said, if your dog has a diagnosed condition like IBD or food allergies, check with your vet before introducing any new food.
Can I substitute chicken thighs for chicken breast in this recipe?
Yes, and honestly thighs add a little extra flavor that Biscuit seems to love. They’re slightly higher in fat, which is fine for most healthy dogs, but if your dog is on a low-fat diet for any reason I’d stick with breast meat to keep things leaner.
How long does this recipe take from start to finish?
From pulling ingredients out of the fridge to having cooled, portioned food ready, I’d say about 45 to 55 minutes total.
The active cooking time is shorter — maybe 30 minutes — but I factor in the cooling time before I can portion and store everything.
What’s the best way to reheat this food without losing nutrients?
I microwave individual portions for no more than 10 to 15 seconds, just enough to take the refrigerator chill off.
I never reheat the whole batch or bring it to a boil again — that kind of repeated high heat breaks down vitamins and changes the texture in ways I don’t love. Room temperature or very slightly warmed is the sweet spot.
Can I add other vegetables to this recipe beyond what’s listed?
Yes, I switch things up regularly based on what I have. Carrots, zucchini, green beans, and spinach all work well.
Just make sure to avoid onions, garlic, grapes, and anything from the allium family — those are genuinely toxic to dogs and not something I’d ever include regardless of how convenient they might seem.
Final Thoughts
This chicken and oatmeal dog food recipe has genuinely become one of my favorite things I do for Biscuit. It costs less than premium kibble, I know exactly what’s in it, and every time I make it I feel like I’m actually doing something good for him — not just filling a bowl.
All content on this site is written and reviewed by our experienced team to ensure it is accurate, reliable, and helpful for our readers. Our Our Process page explains how we carefully research and create high-quality content, while our Team page introduces the professionals behind our work. We also provide clear guidelines for content or image concerns on our Image Removal page, so you can trust that we prioritize transparency, quality, and reader safety.