The Ultimate Guide To Cleaning Dirty Grout Lines
If you’ve ever stood back after mopping and still felt disappointed, grout is usually the reason. I’ve been there more times than I can count—tiles shining, floor spotless, yet those dark, dingy lines ruin the whole look. Grout is porous by nature, so it quietly absorbs dirt, grease, moisture, and bacteria over time. That buildup doesn’t mean you’re bad at cleaning. It means grout needs a smarter, more targeted approach than regular floor care. The good news is you don’t need professionals, expensive machines, or harsh chemicals to fix it. With the right understanding and a method that actually works, grout can go from grimy to shockingly clean.
First, figure out what you’re dealing with
Before touching a cleaner or brush, you need to know what kind of grout you’re working with. This step alone can save you from damage and frustration. I’ve learned the hard way that grout isn’t universal, and treating all grout the same usually leads to poor results or even permanent wear.
There are two common grout types you’ll encounter. Sanded grout is typically used on floors and wider joints. It has a rougher texture and can handle a bit more scrubbing. Unsanded grout is smoother and usually found on walls, backsplashes, and shower surrounds. It’s more delicate and easier to damage if you go in too aggressively.
Color matters more than most people realize. Light grout shows every stain, water mark, and hint of mold. Dark grout hides dirt better but still traps it below the surface, which eventually causes dullness and odor. Sealant is another critical factor. When you drip water on grout and it beads up, it’s sealed and somewhat protected. If it darkens immediately, that grout is unsealed and absorbing everything it touches.
Location also changes the game. Kitchen grout is constantly exposed to grease and food residue. Bathroom grout fights soap scum, hard water minerals, and mildew. Floors deal with ground-in dirt and foot traffic. Each environment needs a slightly different approach to truly get grout clean, not just temporarily lighter.
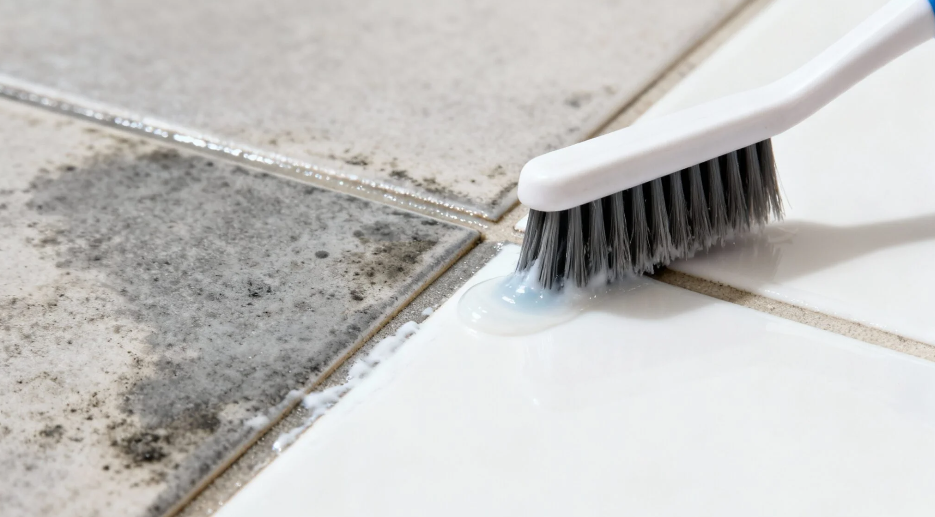
Gather your cleaning arsenal
You don’t need a cabinet full of products. Over the years, I’ve found that a small set of reliable tools and cleaners consistently delivers better results than throwing random sprays at the problem.
A soft to medium bristle brush is essential. A proper grout brush is ideal, but an old toothbrush can work for small areas. What matters is control, not brute force. Microfiber cloths are your best friend for wiping residue and drying surfaces without lint. A spray bottle lets you control how much cleaner you apply and keeps solutions fresh.
For cleaners, baking soda and hydrogen peroxide are incredibly effective for stained, light-colored grout. White vinegar works well for soap scum and mineral buildup, though it should never touch natural stone. Oxygen bleach is one of the safest and most powerful options for deep stains because it lifts discoloration without stripping color. In kitchens, an alkaline degreaser is often the only thing that truly cuts through oil that has soaked into grout over time. A steam cleaner isn’t required, but when you use one correctly, it can transform heavily soiled grout without chemicals. After everything is clean, a penetrating grout sealer is what locks in your hard work.
Your simple step-by-step cleaning plan
This is the routine I rely on when I want results that actually last. It’s methodical, realistic, and designed to clean deeply without destroying grout.
Always start dry. Vacuuming or sweeping removes loose dirt that would otherwise turn into muddy paste once liquid hits it. That grit can grind into grout during scrubbing if you skip this step. Next, lightly pre-wet the grout with warm water. Damp grout absorbs cleaning solutions more evenly and prevents cleaners from soaking in too fast or drying out.
Choosing the right cleaner makes all the difference. For mild grime, a diluted vinegar solution works well on non-stone surfaces. For stained light grout, a paste made from baking soda and hydrogen peroxide pulls discoloration out of the pores. Grease-heavy areas need an alkaline degreaser mixed according to directions. For deeply embedded dirt, oxygen bleach is the most reliable option.
Once applied, let the cleaner sit. This dwell time is where the magic happens. Five to ten minutes allows dirt to break down so you’re not relying entirely on scrubbing. Keep the grout damp during this time. Then scrub using short, controlled strokes along the grout line. Working in small sections prevents burnout and ensures even results.
Rinsing is not optional. Any leftover residue attracts new dirt faster than clean grout ever would. Wipe thoroughly with clean water and a microfiber cloth. Drying matters just as much. Wet grout can look clean temporarily, but once it dries, hidden stains show themselves. Drying also prevents mildew from returning.
When to bring out the steam
Steam is incredibly effective in bathrooms and high-traffic areas where bacteria and grime build up quickly. Used correctly, it loosens dirt and sanitizes without chemical fumes. I always use a narrow nozzle, keep it moving, and immediately wipe the area dry. Steam works best as a deep-cleaning boost, not a daily habit, especially if grout is older or fragile.
Targeted fixes for common grout problems
Different grout problems need specific solutions. One-size-fits-all cleaning rarely works long term.
Soap scum and mineral deposits respond best to vinegar-based solutions on safe surfaces. For tougher spots, combining baking soda with vinegar creates a bubbling action that helps lift residue. On stone, only pH-neutral cleaners should be used to avoid etching.
Mold and mildew are best tackled with hydrogen peroxide. It penetrates grout, whitens stains, and disinfects without damaging surrounding surfaces. Chlorine bleach should be a last resort and used carefully, with ventilation and proper dilution.
Kitchen grease requires alkaline cleaners because oil bonds tightly to grout. Letting the degreaser sit before scrubbing makes removal far easier. Deep stains on light grout benefit from thick pastes that stay moist long enough to pull discoloration out of the pores.
What about sealed vs. unsealed grout?
Sealed grout is easier to clean and resists staining. Unsealed grout absorbs moisture like a sponge, which is why it darkens quickly and smells musty over time. If water disappears into grout instantly, sealing should be part of your plan once cleaning is done.
Testing is simple. Drop water on the grout and watch how it behaves. Beading means protection. Darkening means it’s time to seal.
How to seal like a pro
Sealing is where most people rush, and that’s a mistake. Grout must be completely dry—at least 24 hours, preferably longer. Penetrating sealers are ideal because they protect from within without leaving a shiny surface. Application should be controlled and neat, and tile should be wiped immediately to prevent haze. Some sealers require a second coat, and testing afterward confirms the job is done right.
Tools and techniques to avoid
Aggressive shortcuts cause long-term damage. Wire brushes scrape away grout and leave rough surfaces that trap even more dirt. Colored sponges can stain light grout. Acidic cleaners permanently damage natural stone. High-pressure washing indoors can loosen tiles and force water underneath surfaces. Mixing chemicals is dangerous and should never be done under any circumstances.
Make it last: easy maintenance habits
The easiest way to keep grout clean is to prevent buildup. Quick habits make a huge difference. Removing water from showers reduces mildew. Using gentle cleaners prevents residue. Vacuuming before mopping keeps dirt from settling into grout. Treating spills immediately stops staining. Re-sealing high-traffic areas keeps grout protected and easier to clean.
Quick weekly routine
A short, consistent routine saves hours of deep cleaning later. Bathrooms benefit from light peroxide sprays and quick wipe-downs. Kitchens need targeted degreasing near sinks and stoves. Floors stay cleaner when vacuumed regularly and spot-treated as soon as grout darkens.
FAQ
Can bleach be used to whiten grout?
Bleach can work, but it’s rarely the best first option. Gentler alternatives clean just as effectively without damaging grout or causing discoloration.
Is a Magic Eraser safe for grout?
It can help with surface grime but should be used cautiously, focusing more on tile than grout.
Why does grout look clean when wet but dirty when dry?
That usually means stains are trapped inside the grout. Deeper treatments are needed to pull them out fully.
Will steam damage grout?
When used correctly and briefly, steam is safe for intact grout.
How are cracks or missing grout fixed?
Loose material must be removed, replaced with fresh grout, allowed to cure, and sealed properly.
Can grout be recolored instead of replaced?
Grout color sealers can refresh appearance and add protection, but only if grout is thoroughly cleaned first.
Conclusion of Ultimate Guide To Cleaning Dirty Grout Lines
Grout gets dirty because it absorbs everything it touches, not because you failed at cleaning. Once you understand how grout behaves and treat it accordingly, results become predictable and long-lasting. Using the right cleaner, giving it time to work, scrubbing with intention, rinsing thoroughly, and sealing afterward transforms grout from a constant frustration into something that stays clean with minimal effort. When grout is handled correctly, floors and walls don’t just look cleaner—they look completely renewed.